Pages

Thursday, June 23, 2011

Coopercoat Antifouling??

The people over at ventspleen.com have posted a very good summary of their experience with coppercoat antifouling. This was something I was looking at useing on my last haulout but decided against it. I'm useing Altex #5 copper ablative paint and dived on the boat yesterday (after 7 months in the water) and other than a little slim at the waterline, my hull remains clean with no need to scrub/clean. The article continues below.....


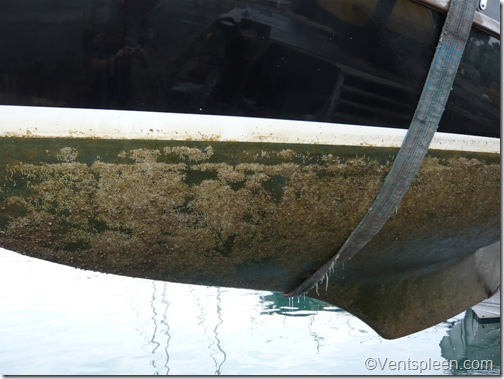
P1030422
This is how my hull looked when I hauled it this year. This could never be described as working well.
P1030424
Here is a close up of a typical area of the hull. Covered in growth and barnacles. Even the cheapest antifouling paints work better than this! It has to scraped off with much effort by hand.
It seemed like such a good idea, an antifouling that you apply once and then forget about it for ten years or more. When I bought my new boat I decided to try it.
Cost wise it costs about 100 Euros a litre. A small boat of about 25 feet might use 6 litres. It’s a little more complicated than this as you will have to lift the boat twice to be able to get at the areas where the boats rest on the pads of the cradle and that will cost a bit more. You need to wait a few days before launching so expect a week ashore.
It is water based so it’s easy to clean up. Basically it consists of a resin and a hardener which come in half litre packs. They are mixed together and then pure copper powder is added to the mix. The Coppercoat is rolled on coat on coat until it’s all gone. Normally you need about 5 or 6 coats for a good result. The finished result is a lovely copper colour which soon goes green as the copper in the epoxy becomes exposed.
There have been a lot of reports about how effective Coppercoat is as an antifouling, often out performing the best ablative paints. On some boats it’s still working well after 14 years! Over 30,000 boats have been coated with it over the years which must say something. I was very keen to try it as it is better for the environment than paint and in theory at least should save money and time in the long run.
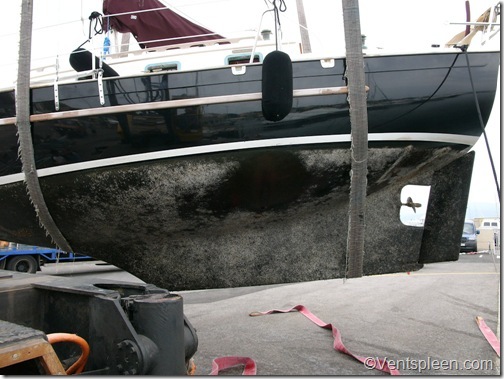
L1050615
This is how the hull looked after one year. The only clean area on the hull is above the galley sink outlet where fresh water comes out.
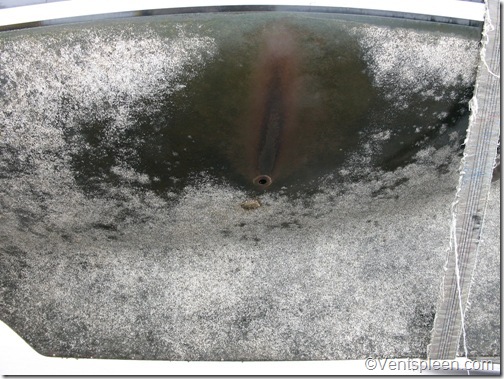
L1050622
Here’s a close up. The hull is completely fouled.
I must confess that I have not been impressed with Coppercoat on my boat and I have talked to them about it but all they say is that not enough copper has been exposed and to sand it down. I have tried this approach various times on certain areas on the hull to see if it would make a difference. It did not.
I tried waiting to see if the natural wear of the epoxy would expose more copper in time but in the 6 years it has been on the boat, it has only performed well for one of them.
It’s not like the boat isn’t used either and just sits in a marina, every year it is moving and sailing for at least 4 months at a time but even when we are sailing we have to dive down on the hull and scrub it to keep it clean.
As you can see from the pictures the fouling is bad and even the cheapest antifouling paints work better than this.
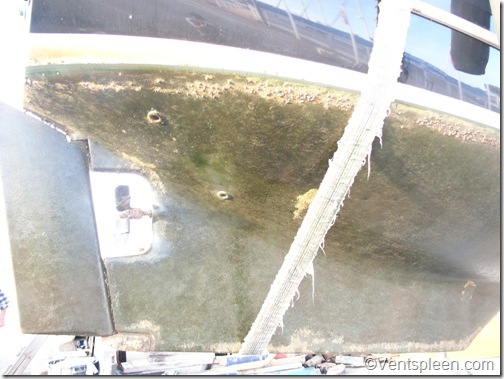
L1120259
This was the boat after three years. Marginally better but still pretty poor overall. Also consider that we dive on the boat regularly and scrub the hull as well.
On the plus side, I don’t have to paint the boat every year but on the down side the Coppercoat just doesn’t work very well. After last year when the boat was clean, I had hoped that finally the Coppercoat had started to work but when I hauled the boat this year I was disappointed to see that the fouling was as bad as it had ever been.
One has to question the benefits of using Coppercoat if it doesn’t stop fouling. Although it might be better for the environment it’s not keeping my bottom clean and this means that when I motor I am using more fuel and that is bad for the environment!
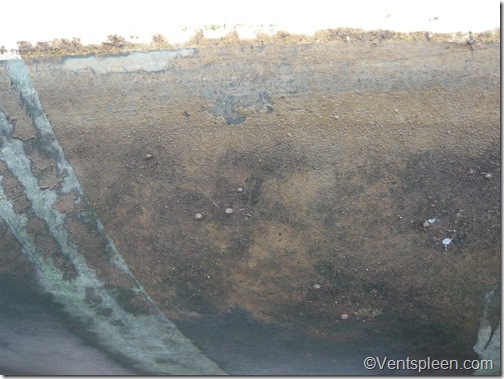
P1020549
This is the Coppercoat after five years. At last, I thought it was working well with only a covering of slime and a handful of barnacles. Compared to how it worked in the previous years it was very clean. The following year it was worth than ever.
Over the years I have recommended and applied Coppercoat to quite a few boats but only one of them has remained fairly clean, all the others have reported merely average efficiency and have told me that they wouldn’t apply it again. One of my customers was so unhappy with it that he simply overcoated it with normal antifouling paint. I haven’t heard from him since.
Another issue with Coppercoat is that it cannot be applied to existing paint so you’ll need to strip that off if you do want to use it and this will also add to the cost. Now that I have seen how Coppercoat performs over the years on mine and other’s boats I would no longer recommend it to those who need to strip their old paint off first. It might be worth putting on a new boat but there is no guarantee that the product will stop fouling.
It hasn’t worked for me and the best Coppercoat can do for me is offer the product at cost so I can try again but doing this would leave me seriously out of pocket what with boat lifting, boat storage and the fact that I would have to take time off work to do it. And at the end no guarantee than it would work any better than it has been.
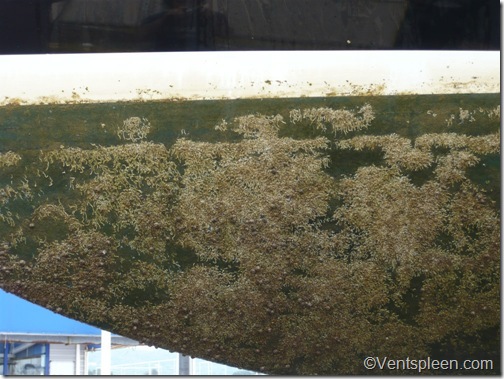
P1030425
The state of the hull this year. The crane driver said it was the dirtiest boat he had seen this year.
The bottom line is that I am very disappointed with Coppercoat. I am pleased that on the one hand that I do not have to pollute the environment by painting my boat every year but on the other hand my bottom is constantly fouled and that slows me down and costs money in extra fuel.
After this disappointing experience I very much doubt I will be using Coppercoat again. The biggest disappointment comes from the lack of support from Coppercoat who keep reminding me about all the other customers of theirs who are happy with their Coppercoat. If they really believed in their product they would make it work for me the way they claim it works for others. It should not be me that has to buy the product and pay to have it reapplied.
It’s a real shame, I really hoped Coppercoat would have been the answer to keep my hull from fouling and at the same time reduce my impact on the environment but it hasn’t worked out like that for me or anyone else I know. Perhaps you know someone who is happy with their Coppercoat, I have yet  to meet someone who is…..

Wednesday, June 22, 2011

Mildew removal and control

The web site  yandina.com has some interesting information on their mildew removal and control. It reads...
Unfortunately mildew is a common problem on boats. Commercial mildew removers are expensive and have a limited life in storage. Apart from the obvious of keeping dry and ventilation, here are a couple of tips for combating mildew.

MILDEW REMOVAL

You will need to purchase some concentrate. I use AQUA CHEM spa care SHOCK TREATMENT. It is a white powder and the active ingredient is Lithium Hypochlorite, 29%. It is sold as a chlorinating shock treatment for spas and hot tubs and you will find it, or an equivalent, at any pool chemical supply. I purchased 16 ounces for $5.97 at Walmart. 16 ounces should supply enough mildew remover for approximately 50 years on a 71 foot boat!
Mix in the ratio of one level teaspoon of powder to one gallon of water. That teaspoon full doesn't look like it will be enough in that big gallon of water but don't be tempted to put more in - the powder is super concentrated and this ratio works very well. Since the label says it is a Federal offense to use this product other than indicated on the label, I suggest you take your boat out beyond the three mile limit before performing these illegal acts.
The solution should be kept in a sealed container, plastic bottles with a screw cap work well. Label well to avoid accidents. Transfer as required to a spray bottle but don't store it in the spray bottle since the air vent seems to allow the strength to weaken in a few days. Even in the sealed container it lasts only a few weeks but it is so cheap compared to commercial preparations - go ahead, make another gallon.
Don't dispose of excess solution or powder in the water unless extremely diluted as it is toxic to marine life. If left over solution gets too weak to use, I dilute it in my bilge and allow it to sit there exposed to the atmosphere for a few days before pumping overboard. So long as there is no oil in your bilge this helps keep your bilge clean and kills any smelly bacteria before emptying. I have a large bilge and plenty of ventilation, smaller boats might need to find an alternate disposal method but in small quantities it should not be worse than having an indoor spa.
On smooth surfaces - paint, vinyl, varnish etc., - spray on, leave a few seconds to work, and wipe off. You can even wet a paper towel and just wipe slowly and it will work. There is no need to rinse the surface, in fact I think the residue inhibits the re-growth of mildew. There is some chlorine smell so make sure you have plenty of ventilation.

REMOVING MILDEW FROM DOCK LINES, CANVAS, RIGGING AND ROUGH SURFACES

Chemicals and scrubbing work fine on smooth surfaces but on halyards, dock lines, awnings, etc it is impossible to scrub down into all the cavities so a black residue is left which not only still looks dirty but is the seed for new algae to start growing.
The easiest way to get these looking like new is a pressure washer. You can do lines without removing or lay them down and move them a couple of times until you get all sides. It doesn't take much pressure and you may do some damage with a commercial high pressure unit so experiment with a pressure adjustment if there is one, or back off sufficiently so there is just enough pressure to remove the dirt and mildew. Just use plain water, you don't need to add any soap, detergent chlorine or Lithium Hypochlorite.

MILDEW PREVENTION

Most marine stores and catalogs sell a product called DI-GAS or MIL-DU-GAS and I have occasionally seen the equivalent in WalMart. These products are labeled "HAZARDOUS TO HUMANS AND DOMESTIC ANIMALS" and contain PARAFORMALDEHYDE. When not sold to the marine market these products are labeled "NOT FOR INDOOR USE". With the restricted ventilation in boats this warning should be more applicable! CAUTION, they are quite nasty, in fact, if you use it as instructed you boat will become uninhabitable. DO NOT USE AS INSTRUCTED.
Despite the above warnings against these products, they do work well to prevent mildew and the "boat odors" in closets etc. Use these products by opening the seal as instructed but then enclosing them in a zip lock plastic bag. Cut a ¼" hole high in the side of the bag and hang in your closet. The reduced dissipation is still sufficient to prevent mildew and the bag of poison lasts a year or more instead of a couple of months. This works well for enclosed spaces but I do not recommend trying to control mildew by treating the whole boat space, unless the boat is unoccupied for an extended time.

Tuesday, June 21, 2011

Remote Battery Wiring

A separate battery to run a winch or bow thruster is cheaper, safer and works better than running a heavy cable from your starting or house bank.

This installation requires some electrical skills and since errors could cause an electrical fire you should not attempt it unless you feel confident. This project has not been checked for compliance with ABYC or USCG standards and the author presents this as a guideline to be interpreted by qualified installers. No warranty or guarantee is given or implied.


THE THEORY BEHIND THIS PROJECT


Winches and bow thrusters, located in the bow, are usually a long distance from the starting or house batteries. These items draw a heavy current for a short period of time. Unless you use very heavy cable for the long run, the voltage drop by the time it gets to the device, will have reduced the available power.
What is worse, however, is that very heavy copper cable is an invitation for an on-board fire if it gets shorted so for safety you have to add a large fuse - large enough to take the stalled motor load of the winch without giving you a nuisance blow - yet small enough that a short at the far end can draw enough current through that long cable to blow the fuse.
In many installations, these requirements conflict making practical current protection impossible.
The current drawn by the stalled motor is often so close to the current drawn by a short at the remote end that any fuse or circuit breaker that can protect against the short, will give nuisance blows just when you really need it.


PROVIDING A REMOTE BATTERY IS SAFER, CHEAPER AND WORKS BETTER

Instead of installing a very expensive heavy gauge copper line up AND BACK, and the expensive fuse to protect it, install a battery in the forepeak to provide local power. Now, the heavy wire is very short with very little voltage drop, and you can keep the battery charged with an economical charging line. Depending on the size of the device to be powered you can usually get by with a low cost automotive starting battery. These are made to take heavy loads for short periods of time and remain on float charge the rest of the running time. Since the charging line is low current, it is easy to provide fuse or circuit breaker protection. By installing a 50 amp combiner in series with the charging line, the remote battery will be maintained at full charge without any diode drop yet it will not discharge back into the house or starting battery.
NOTE:- Since there is a battery at each end of the charging line you need a fuse or circuit breaker at EACH end.

INSTALLATION

Parts List:-
  • Automotive battery with enough capacity to run the device for the longest job. (Multiply AVERAGE current by time in hours to get amp-hours required, then double this figure. Example, 80 amps x 30/60 hours x 2 = 80AH ) For charging compatibility it should be the same type (lead-acid or gel) as the starting battery.
  • 50 amp combiner The combiner should be mounted with the remote battery.
  • Two fuses or circuit breakers. I prefer the automatic reset thermal breakers that are typical in the automotive industry. 
  • A good quality battery box. 
  • Red and Black cables for the charging line - 10 gauge is adequate.
  • Conduit to protect charging line - essential on a metal boat, desirable on others.
Select a location for the forward battery. It should be ventillated because the battery will be on charge much of the time and producing small amounts of hydrogen that could be explosive if allowed to concentrate. Larger installations might consider an automatic power vent that only runs when dangerous gasses are being produced. A gel type battery is much less of an explosive gas problem but it is still present if overcharged.
Provide a SOLID mounting for the battery and battery box. Keep in mind that the bow takes much more of a pounding than the traditional battery locations so go overboard (not literally) on strengthening the mounting. The battery (box) must be rock solid when strapped down. Due to the motion and stresses, I would not use the conventional webbing strap they supply as the buckles provided are usually poor. Good quality ratcheting strap(s) of a material that is acid proof would be better, or provide a stainless retainer with through bolts and wing nuts.
Remote.GIF - 5464 Bytes Connect the device to the battery following manufacturer's suggestions. Connect the charging line, following this schematic and the installation instructions supplied with the combiner. If you use our thermal circuit breakers, you must use crimp on ring terminals to connect the wire - the screws are too small to adequately secure 10 gauge stranded wire, even if tinned.

Monday, June 20, 2011

24V from 12V

This is a traditional problem that typically has very dangerous and expensive switching. Typically it is done with a second battery that is kept in parallel with your 12 volt starting or house battery for charging, but is switched in series with that battery to run the 24 volt item - bow thruster, winch etc. This is expensive and dangerous. You have to use two very heavy duty switches, one to switch the negative of the additional battery from the -12 to the + 12 of the starting battery, and the other to disconnect the +12 of the additional battery from the starting battery.
BUT THE TIMING IS CRITICAL. If one switch is operated before the other you will end up shorting a battery and cause an explosion.

So here is how to do it the safe way using only a single pole single throw switch.

In the circuit diagram, you will see that the auxilliary battery is connected in parallel to the 12 volt battery through a pair of headlamps, one in the positive lead and one in the negative. With the "24 VOLT" switch open, the charge on the additional battery will be the same as the 12 volt starting battery because the headlamps, which carry a couple of amps when lit, will trickle charge the additional battery to the full voltage. Under normal circumstances, the headlamps will only have a fraction of a volt across them so except under heavy charging/discharging conditions they will stay off or have a very dim glow. 24VoltBattery.jpg - 38428 Bytes
There will be 12 volts going to the 24 volt load when the switch is in the 12 volt position but since the headlamps are in series with the circuit, if the bow thruster were turned on, only a couple of amps would flow and the headlamps would light. When you close the 24 volt switch, the batteries are now in series and 24 volts is available for the bow thruster. While in the 24 volt mode, a couple of amps will flow through each headlamp and they will come on full brilliance. The amount of energy wasted, however, is small compared to the battery capacity and the few amps through them does not materially diminish the high current available for the thruster.

COMPONENT SELECTION

The BATTERY capacity of the auxiliary will be a function of how long you think you will need the bow thruster in one session, and how often sessions will occur. Refer to the bow thruster current requirements to determine this figure. For example, if the bow thruster draws 50 amps (about 1.5 horsepower) and you need to be able to run it for up to 30 minutes, that comes to 50 x 0.5hr = 25 amp hours. You should double this figure to provide a safety factor and reduce cycling the battery below the 50% charge level. So a 100 amp-hour automobile battery for about $35 would be ideal. You should match the chemistry of the battery to that of the starting battery - don't mix an AGM or GELL battery with a WET lead acid. Otherwise the batteries can be of different ages, manufacturers or style. You don't need a deep cycle battery here - the usage is more like that of a starter motor battery in an automobile.
Charging time after a typical use can be calculated by dividing the amp-hours used, say 25 in a 30 minute period, by the charging current, say 4 amps = 6 hours, or 12 times the discharge time.
The HEADLAMPS should usually be the highest wattage you can find. In fact I use a high/low beam headlamp and wire the high and low terminals together so both filaments are in parallel. The high temperature will reduce life but since they are only going to be on for a few minutes a day maximum, who cares? A major advantage of using headlamps to limit the current is that the resistance is non linear. As they cool down the resistance goes down dramatically and they tend to draw a constant current for charging even though they are not brightly lit. You should consider placing the headlamps so the light is visible from the bow thruster control panel location so you don't forget to switch back to CHARGING when the bow thruster is no longer needed, otherwise the headlamps will eventually discharge the auxiliary battery.
The SWITCH should be sized for the maximum current of the bow thruster plus a safety margin. For an economical installation, a simple battery disconnect switch is ideal. If you want a remote control, then you should use a simple single pole, normally open relay instead of the switch. We have a 130 amp relay in our Parts and Kits catalog that will handle many thrusters.
The CABLES should be sized as recommended by the bow thruster manufacturer with regard to the length of the run. Note that only the cables to the switch have to be this size. The cables to the headlamps only have to carry a few amps so a 12 or 14 gauge wire would be adequate.